Vendor Enablement lets an organization control which third-party software vendors (from the platform catalog) are turned on or off for that organization’s data and integrations. Vendors appear in the list by default as off until someone enables them.
In short:
- Vendor catalog — Vendors offered by the platform (ThirdPartySoftware); your organization sees them on the enablement page when that experience is available for your org.
- Enablement — Whether your organization has actively turned on a vendor (VendorEnablement).
When a vendor is enabled, permitted integration flows (for example, those served through the Ascend product and platform APIs) can run for that vendor. When disabled, those flows are turned off at the organization level.
- Give practices clear control over third-party access aligned with their agreements and security posture.
- Support consistent onboarding: practices choose which catalog vendors to enable for their organization.
- Provide a single place in the product to see vendor names, descriptions, and whether each one is currently on or off.
Note: Exact menu labels and navigation can vary slightly by product version. If your screen differs, search organization or integration settings for vendor, third party, or enablement.
- Sign in with a role that can manage organization-level integration or vendor settings (your admin guide defines the exact permission).
- Confirm with Henry Schein or your implementation contact if a vendor does not appear in the list — the vendor may need to be added to the platform catalog, or your organization may not have access to the Vendor Enablement experience yet.
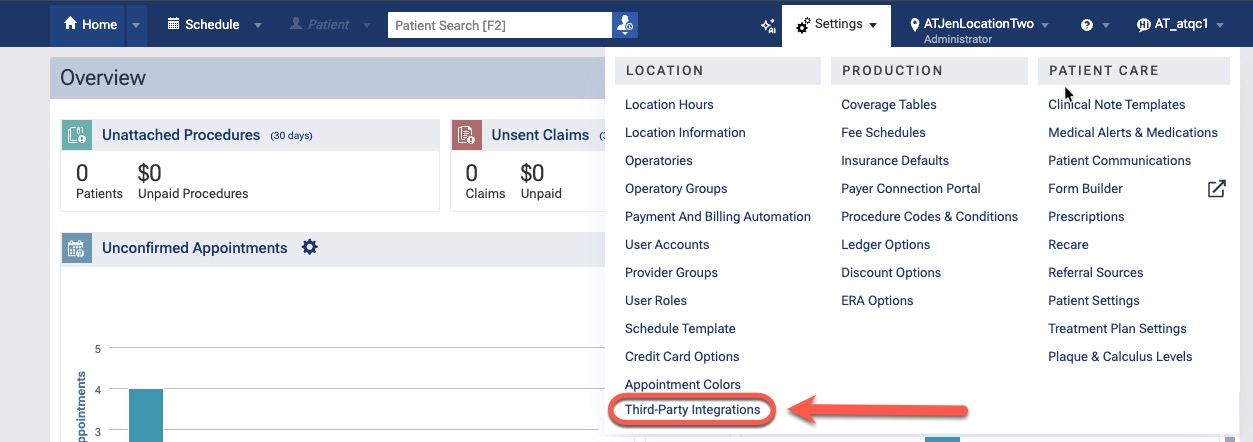
Figure: VendorEnableSettingPage.jpg — Example Vendor Enablement / organization settings entry point (layout may vary by version).
- Open your organization’s Vendor Enablement, Third-Party Integrations, or equivalent page (exact title depends on product version).
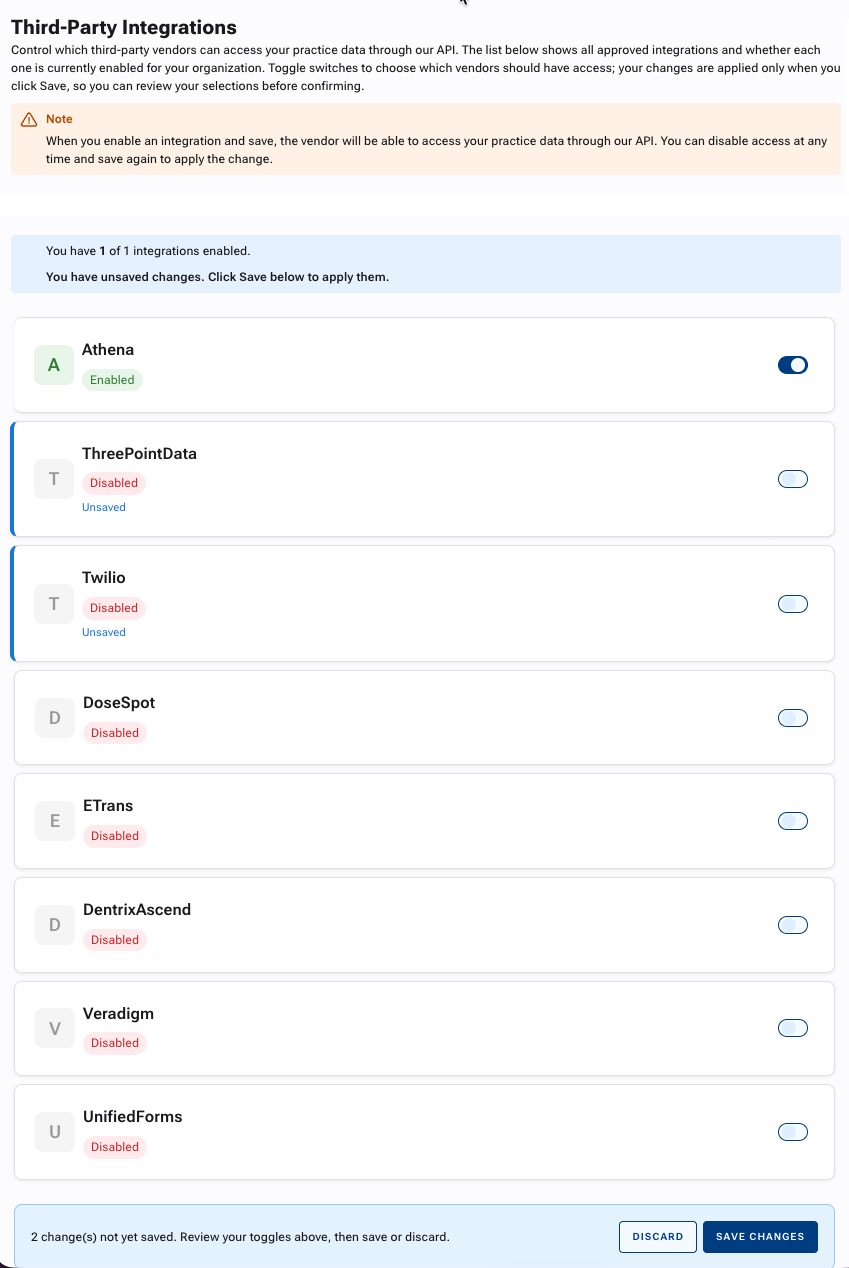
Figure: VendorEnableList.jpg — Vendor list on Third-Party Integrations: vendors with status, descriptions, and per-row enable/disable controls; Unsaved when you change a toggle; messaging that changes apply only after Save; SAVE CHANGES / DISCARD at the bottom.
Review the list of vendors and each vendor’s description.
Enable a vendor to allow its integration for your organization, or Disable to turn it off.
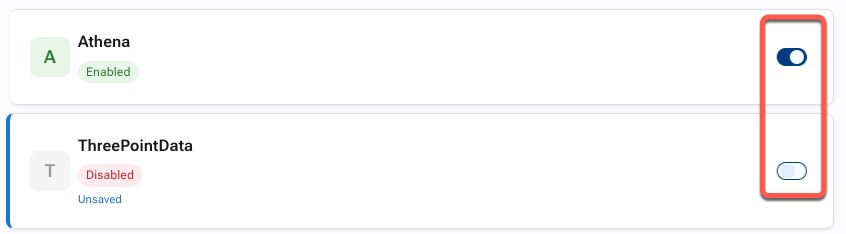
Figure: VendorEnable:Disable.jpg — Enable or disable a vendor for your organization; control type may be a toggle, switch, or other action depending on version.
- Save your changes. Use SAVE CHANGES, Save, or equivalent so the server stores your choices. The page may show “unsaved changes” banners and an Unsaved label on a row until you save. Vendor enablement does not update until you save — if you navigate away or close without saving, your toggles are discarded and prior settings remain in effect. Use DISCARD if you want to revert pending toggles without saving.

Figure: ThirdPartyIntegrationSaveButton.jpg — Footer action bar: SAVE CHANGES commits your toggles; DISCARD drops pending edits.
- After a successful save, confirm the UI reflects the new state. Note dates (if shown) for when a vendor was last enabled or disabled for audit purposes.
Important: Always complete the Save step. Skipping it is a common reason changes appear to “not work” or integrations still behave as before.
- Vendor name and description — Helps you confirm you are enabling the correct integration partner.
- Enabled / disabled state — Current on/off status for your organization.
- Actions — Controls to enable or disable (exact control type may be a toggle, button, or menu action).
- Save — Commits your changes to the organization. You may see SAVE CHANGES, Save, or Save changes depending on version.
- Discard — Drops pending toggle changes without applying them (when shown).
- Unsaved / unsaved changes messaging — Reminds you that toggles are not live until you save.
| Concept | Meaning |
|---|---|
| Listed vendor | Integration partners defined in ThirdPartySoftware appear for your organization; each row defaults to off until you enable it. |
| Enabled | Your organization has turned the vendor on (stored in VendorEnablement). |
| Disabled | The vendor appears in the list but is off, or it was previously on and has been turned off. |
If enable or disable fails for another reason (for example OrgMapper or configuration), use your standard support channel with the organization ID and vendor name.
Vendor Enablement is enforced in the platform when calls are made in an authenticated organization context. The Public API exposes internal Vendor Enablement operations (for example, used by the Ascend BFF), not as a direct integration surface for external partners.
External integrators should implement against the documented public endpoints and auth model; practice users manage enablement in the product UI as described above.
- API Consumer Guide — Authentication, headers, and calling patterns for the Public API.
- Obtaining Prod Access — Production onboarding expectations.
If something in Vendor Enablement does not match what you expect (missing vendor, cannot enable, or errors), use your standard issue reporting channel with the organization ID and vendor name.